|
|
|
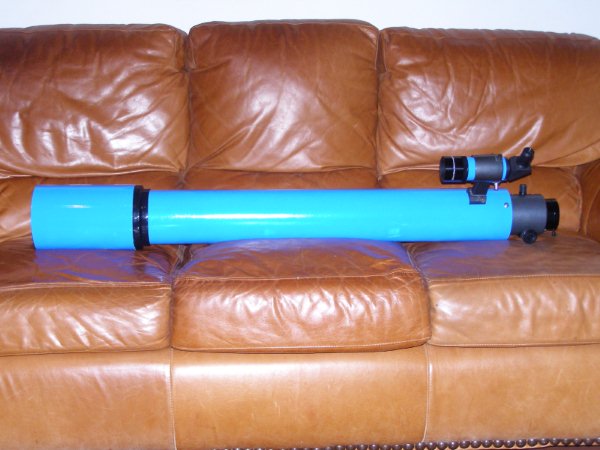
The VSC/ SAO 100mm f/13
"Mary Dawson" Refractor
Mel's
First Light Report

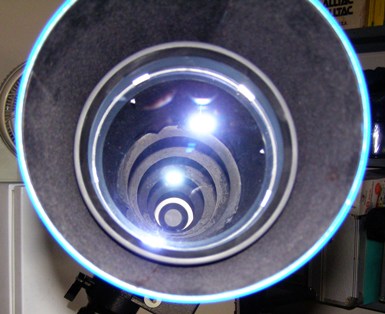
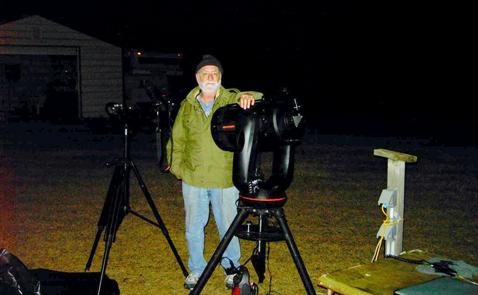
Here is a shot of
me with my homebuilt Carton 100mm f/13 on July 10, 2010 during its First
Light session. My mom would truly be proud of this instrument, which bares
her name.
Hello Good Friends,
As some of you may already know, I am recovering from a stroke that took
place on the morning of June 20, 2010, which was Father's Day. Thanks to God
and the prayers, strength, and support of so many of you, I am happy to
announce that I received the best gift any one could receive - LIFE! Because
of this blessing, I also was able to perform First Light with my Carton
100mm f/13 on July 10, 2010! Less than a month after my sudden demise. Here
is my report...
As dusk came and
the skies turned a deep teal blue at around 9:00pm EDT, my first target with
the �Mary Dawson� refractor was Venus. Using a TeleVue 15mm Plossl, which
yield a magnification of 87x, I slowly focused Venus in the field of view
and was very pleased at the image I was seeing. Despite some purple
fringing, Venus was very sharp and CA was held very, very low even though
Venus was low in the sky. Typically, viewing objects that low in the sky
would general tease out the CA of many a celestial object. But, the
instrument held this aberration to an extreme minimum; impressive indeed!
Enjoying the view, I moved up to a TeleVue 11mm Plossl. This gave me a power
of 118x. At this magnification I could easily make out slight irregularities
in the Venusian terminator of its gibbous phase. That was quite a sight! It
was the best view I have ever seen through and refractor I have owned.
Again, purple fringing was present, but in no way was it an issue. CA was
practically nonexistent. Contrast was outstanding through the test.
Darkness settled in good at about 10:00pm EDT, and it was time to check out
some of those DSO�s and Double Stars! With my good friend Gary Barabino on
the other end of the phone, he suggested that I check out M13, the Hercules
Cluster. The globular cluster was approaching the meridian from my vantage
point and prime for viewing. I realize that the 100mm is not a light bucket;
however I wanted to see what it could do on DSO�s. Bright globular clusters
can produce surprisingly beautiful images when put under moderate
magnification. It was no surprising in the Carton. M13 was resolved to the
core with ease at 87x with the TeleVue 11mm Plossl. At 118x with the TeleVue
11mm, the core sparkled like diamonds. I only wish I was out at a dark
remote site to take it all in. The next DSO I chose to check out was M57,
the Ring Nebular. Why the Ring Nebula? Well, I wanted to see how well the
optics of this �four incher� would fair on an object that is generally
viewed with large aperture telescopes. Once again, I was quite impressed
with the image. The ghostly ring stood out even at 118x! Of course, seeing
the central star was impossible. Nevertheless, you could make out the shape
and some faint structure in the ring�s nebulosity. I am really digging this
scope, man!
Around 10:45pm EDT, I decided to check out a couple of brightest stars.
First up was Arcturus. This star produced a very tight disk with minimal
flaring. Diffraction rings (two) were close to the star�s disk and the color
was a pale orange. Only a little purple fringing was discerned. Very nice
image! Next up was Vega. Again tight diffraction rings (two) and the color
appeared a brilliant blue-white. Purple fringing was a bit more prominent on
Vega as compared to Arcturus, but nothing to be upset over at all.
Moving on, it was time to check out a double star, and the one of choice was
Epsilon Lyrae, the Double-Double. What really struck me was how tiny the
disks of the stars were. Also how tight the diffraction rings were in
relation to the stars. Simply amazing how small the airy disks were.
I wanted to check out a few more objects, but I started to get a bit tired.
So at around 11:30pm EDT, I called it a night. In conclusion, I could not
have asked for a better result after tonight�s First Light session with my
Carton 100mm f/13 �Mary Dawson� refractor. Total success was achieved! Doug
is so right to exonerate the attributes of this fine instrument the way he
does. It literally produces APO like image quality, but in a larger package.
However, an APO would never touch the magnification this lady could produce.
I am very pleased with this instrument and will be reporting back with more
observing session details in short order! If you want a telescope in the 4�
range, get yourself one of these objectives. I saved plenty cash in building
my own like many others here on this thread. But, the optical results of
this refractor are worthy of telescopes costing far more.

|
|
VSC/ SAO Carton 100mm f/13 "Mary
Dawson" Refractor
-
On July10, 2010, exactly a
month after the pages for the 127mm's cradle rings, and Dovetail Plate
construction pages were posted on our website, I finally completed the
construction of the VSC/SAO Carton 100mm f/13 "Mary Dawson" refractor.
As with my other home built instruments, I will providing a detail
pictorial overview of this fine refractor. So please stay tuned.
|
The VSC/ VAO 102mm f/8.6 Refractor

-
In May 20, 2010, my
colleague Gary Barabino received his A. Jaegers 102mm f/8.6 cemented
objective after purchasing it off of eBay. As many of us old school amateurs know, A. Jaegers
was a premiere manufacturer and provider of some of the finest Fraunhofer achromatic refractor lenses
in its heyday from the 60's through the 90's.. One of which is the world
renowned 6" f/15 objective, which Gary also owned at one time. Now,
once again G-Cool has jumped on the Jaegers bandwagon with this new
acquisition. I look forward to posting more updates as Gary gets this
great project underway.
|
|
VSC/ SAO 127mm f/9.4 "BGRP" Refractor


-
On June 10, 2010, the Cradle
Rings, Dovetail Plate and Bar construction overview pages were completed
by Mel Dawson. The pages are now available for viewing and can be found
HERE. The Cradle Rings were
fabricated from solid teakwood and with aluminum and stainless
steel hardware. They are solid and reliable. The Dovetail plate was made
from an old network rack base and was cut to size using a bi-metal blade
on my band saw. I hope you find the time to visit these pages, as well
as the pages covering the construction overview of the other components
that make up the VSC/ SAO 127mm f/9.4 "Brigadier General Richard Pierce"
refractor.
|
Gary Barabino's recent
assembly of his
127mm f/9 Refractor

-
On October 26, 2009, Gary
Barabino of the VSC/ VAO completed the assembly of his 127mm f/9 Yulin
refractor he put together from an objective he purchased from Mel Dawson
of the VSC/ SAO and the tube assemble from Sheldon Faworski. On November
13, 2009, I visited Gary at his Slidell, LA residence and was graced
with the pleasure of seeing his new scope acquisition first hand.
Despite the effects of upper level cirrostratus clouds, which hampered our
chances of looking at any faint DSO's, we had a ball using this fine
instrument. Despite the clouds, we were able to observe Jupiter and the
Orion Nebula. The views were quite good, but Gary is currently working
on centering the focuser, which is off axis by about 3/4". For an enlarged
view of Gary's Yulin refractor, please
click the image above. For a more detailed
overview of Gary's refractor work on Cloudy Nights, please click
the link below. His entries are under the member name "BarabinoSr".
Surplus Shed 127mm Refractor Build
|
|
The VSC/ SAO 127mm f/9.4 "Brigadier
General Richard Pierce" Refractor OTA build pages are ready !!!

| A front
angle view of the new VSC/ SAO 127mm f/9.4 "BGRP" refractor OTA . For
a closer look, please click the images above. |
May 15,
2010
Handling a multitude of projects
can be quite daunting. With the build of the Carton 100mm "Mary Dawson"
refractor going on at present, it was a challenge to get the construction
overview web pages of the 127mm f/9.4 underway. Fortunately, I managed to
get the time to complete the design diagrams and the OTA construction pages.
With that said, I will not waste your time, so please click on the button
below to check out the build of a new member of the VSC/ SAO telescope
collection, the VSC/ SAO 127mm f/9.4 "Brigadier General Richard Pierce"
refractor!

|
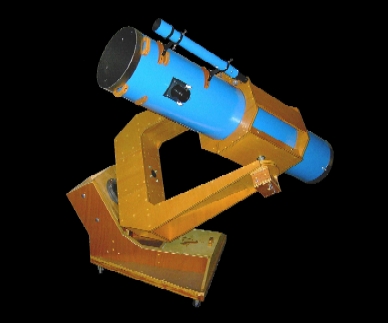
|
The VSC/ SAO 100mm f/13
"Mary Dawson" Refractor OTA
COMING
SOON


| Top and
bottom views of the mounted Carton 100mm f/13 refractor objective I
purchased from Sheldon
Faworski on
February 17, 2010. This objective will be used in the VSC/ SAO 100mm
f/13 "Mary Dawson" Refractor. For
a closer look, please click the images above. |
April, 2010
Once again the
VSC/ SAO will embark on another telescope project. When will it ever end!
This time I will be constructing a long focal length refractor using a
vintage brand new mounted Carton 100mm f/13 objective. I guess many may
wonder why I chose to build another refractor that is so close in size to
the 127mm f/9.4 "BGRP" refractor. Well, after building the 127mm
scope, my primary use for it was for low to medium magnification observing
and astrophotography. It most certainly fills this niche. I also was
"hoping" that it prove to be a decent planetary/ lunar instrument
as well. Unfortunately, it could not hold up to the task; at least not in
the planetary arena. In keeping to the mindset of wanting transportability
as well as high performance from low to high powers, I had to come up with
another solution to fill the high power planetary/ double star void. I
believe I have found it in the Carton 100mm f/13.
Made in Japan by
the Carton Optical Company back in the1980's, this "no longer
produced" air-spaced objective has been time test by many an amateur.
The reviews I have read on Cloudy Nights and elsewhere convey optical
results comparable to A. Jaegers refractors of old. It has also been said
that this objective is one of the finest Carton ever produced. Considering
the time period it was fabricated, and the care used in housing it in a
precision collimatable anodized aluminum cell speaks volumes. Etched
markings denote the achromat's diameter and focal length. At this time,
I can only dream about the views this telescope will render. I just hope the
comments and reviews hold up. If they do, then it will be worthy to carry
the name of my mother, "Mary Dawson", the finest mom anyone could
have. Stay tune for more up dates. In the meantime, please visit Doug76's
thread on Cloudy Nights called "Carton 100mm f/13" where I will be
posting my construction efforts under the username dawsonian2000
until I can get it featured in-depth on this website. The CN link is below.
Click
here to visit the Carton
100mm F/13 thread on
Cloudy Nights !!!
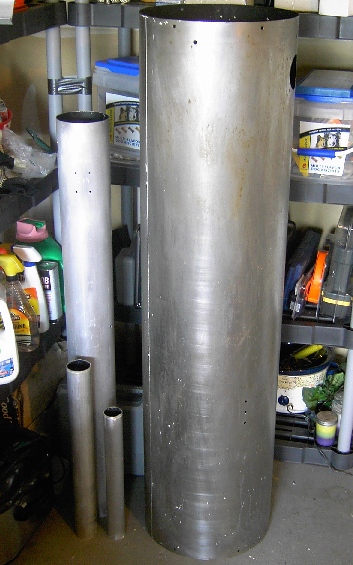
Of recent, I
have instituted the efforts of Brian Choin to construct the rear half
of the cell from aluminum. His expertise in constructing aluminum components
for telescopic instruments are awesome. I sent Brian my design and he will
be starting the milling process soon. More on the rear cell construction
later.
|
|
Performance Upgrade to the VSC/ SAO 127mm f/9.4
"BGRP" Refractor
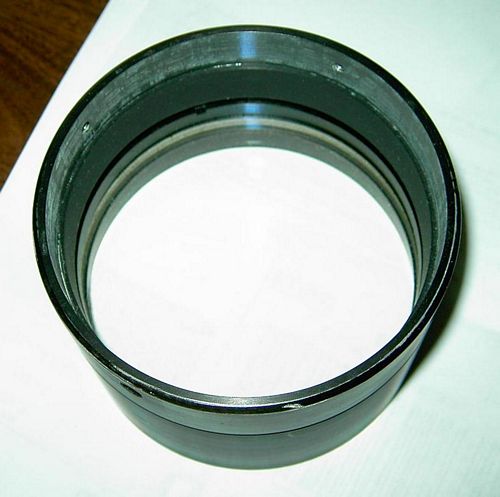
| Here is a shot
of the VSC/ SAO 127mm f/9.4 "BGRP" refractor's objective after the
installation of five evenly distributed aluminum tabs used for air spacing
the lens elements. Click
the photo above for an enlarge view. |
December 31, 2009
With the thought in mind to improve the optical performance of the 127mm
f/9.4 "BGRP" refractor OTA, I considered a number of typical factors. Some
being:
-
Making certain the SurpluShed 127mm f/9.4
lens' thermo-plastic objective cell is precisely mounted
perpendicular to the tube.
-
Align the focuser
perfectly to allow the beam from a laser collimator mounted in it to
hit the objective lens dead center.
-
Install knife-edge baffles
to effectively
minimize the infiltration of stray light from reaching
the eyepiece.
These three factors alone will assuredly improve your refractor's performance
tremendously. But, in the case of the SurpluShed 127mm f/9.4 mounted
objective, I discovered there was more I could do. It was the replacement of
the o-ring that air spaced the crown and flint elements. Below is a report
of my efforts.
In building the VSC/SAO
127mm f/9.4 "BGRP" refractor,
I initially mounted the 127mm
f/9.4 SurpluShed objective with its original plastic
o-ring spacer in place and performed a visual test using a tree off in the
distance. I used various low and high power oculars. I noted that when using
high power eyepieces, I could see a distinct purplish aura around leaves and
branches against the brightly lit sky. This is what caused me to try
replacing the o-ring with tabs made from adhesive backed A/C aluminum duct
tape. Prior to my efforts, my friend Gary Barabino also performed the same
task on his 6" f/8 Konus refractor with great success. I do not know exactly
how thick the o-ring or the aluminum tabs were, but I do know that the
aluminum tabs are thinner than the plastic o-ring. Therefore, the tabs
reduced the air space gap between the elements by at most half the thickness
of the clear plastic o-ring. The end result after replacing the o-ring with
the aluminum tabs was a reduction in purple fringing and chromatic
aberration!
I hope the following details will help you successfully replace the o-ring
should you want to give it a whirl. It is not difficult at all, but care is
of the utmost to prevent damage to your precious lens elements. I would
recommend that you use powder-free latex gloves to prevent fingerprints and
aid in gripping the elements. Kim-Wipes would also be a good surface to
place your lens elements on as you work. Please be careful to not let the
elements hit each other, let alone drop them.
Please keep in mind that Lord Klutz will be lurking
around every corner for just the perfect opportunity to strike. He loves to
make your lens look like a group of clams in the sea.
Before starting, I worked on a soft surface; my bed in this case. I
carefully removed the elements from the objective cell by first unscrewing
and removing the retainer ring. Then, with gloved hands I placed all my
fingertips evenly spaced atop the outer portion of the crown element being
careful not to slide my fingers over the lens surface. Next, with adequate
contact pressure applied to the crown element�s outer surface to prevent the
lenses from tumbling out, I flipped the whole objective cell upside down
(crown element facing downward) continuously supporting the lenses in the
cell while resting my arm on the bed. I kept the cell as level as possible
to prevent the flint element from sliding off of the crown element after
performing the next step since it will be on top once the cell is lifted
off. I then slowly, gently, and meticulously lifted off the cell with the
lens elements well balanced on my fingertips of my other hand. Once the cell
was removed, I carefully lifted off the flint element and flip it over so
that the concave surface is facing up. I then placed it on a soft lint free
surface (Kim-Wipe). The spacer ring clung to the flint element due to
static, but it was not attached with any sort of adhesive. It just sat
between the lenses and was easily removed.
I DID NOT DISCARD THE O-RING!!!
I was also very careful to remember which surface of the crown element faced
outward. This is extremely critical since replacing the elements back in the
cell in the wrong orientation will cause your images to become blurred and
unable to attain a focus. Typically, the side that bulges less goes outward.
In any case,
PLEASE REMEMBER THE ORIENTATION OF THE LENS ELEMENTS!!!
DRAW AN ARROW ON THE SIDE OF THE CROWN ELEMENT TO SHOW WHICH FACE POINTS
OUTWARD!!!
The concave surface of the flint lens (rear element) always faces the back
of the inside surface of the crown element, which should go without saying.
Then, I placed the crown element on a lint free surface (Kim-Wipe), again
noting its orientation. I just can�t say that enough.
With both elements and plastic spacer o-ring removed, I edge-blacken the
lens using a black Sharpie felt tipped marker. Taking care not to apply
marker on the front and rear of any of the elements. If
by chance the marker gets on the face of the lens, you can use an alcohol
based lens cleaning solution to remove it. Only use the cleaner to remove
the spot. Do not apply it over the entire lens. Just remove the marker spot
using the cleaner. After allowing the
marker to dry thoroughly, I began the installation of five aluminum tabs
made from self-adhesive A/C aluminum duct tape evenly spaced around the edge
of the inside surface of the flint element. You can get this tape from any
home improvement facility. A pair of small plastic tweezers aided me quite
well. Just don't allow the tweezers to make contact with the lens. You do not have to use five tabs if you do not want to; three would
work as well. Also, it would be a good idea to make a template of some sort
to help with properly spacing the tabs at the proper angles. If you are going to try
five tabs, they would be spaced 72-degrees from one another; for
three, 120-degrees. In cutting out my tabs, I wanted them to follow the outer
curved contours of the lens edge. My tabs were cut to around 1/2� in
length and about
1/8� deep. Sort of small to work with by hand alone, so the plastic tweezers
come in handy for applying them. Also, when pressing the tabs down flat, I was careful not to
go off the tabs and onto the lens surface, which scratch the lens surface.
Use the back of your fingernail or for precision, use a toothpick. The flint element is softer
then the crown element and is more prone to damage. I know all this stuff
sounds nerve shattering, but with common sense and patients, the average ATM
can do this.
Now, I had no idea as to how this modification would affect the performance of the
objective. I just figured that since most objectives of good quality utilize
thinner aluminum spacers for air spacing the elements, it might do some good
for this objective. As luck would have it, it did! A definite
performance improvement indeed!
Once I applied the tabs, I was ready to reassemble my objective. With
the outside of the crown element (double-convex) placed on my fingertips in the same
orientation as removed, I gently placed the flint element (with the tabs
installed) on top of it with
the concave surface against the inside surface of the flint. Next, I slowly
and carefully lowered the upside down end of the cell over the well balanced
and centered stack of elements until they hit the retainer seat. Applying
adequate pressure to keep the elements seated, I flip the assembly over and
then reinstall the threaded retainer ring. Do not over tighten! You just
want it to make contact to allow for expansion and contraction, but not
allow the elements to separate from one another.
NOTE: If your lens cell is anything like mine, I noticed there was a
fair amount of clearance around the circumference of the objective in the
cell. This will sometimes cause the elements to shift off-axis from one
another, but I must also point out that the curvature of the inside surfaces
of the lens elements will aid in keeping them aligned to one another. So, generally
the gap around the lens sides within the cell in some cases would allow the
entire lens set to shift to one side to a small degree. Therefore, I plan to
add a thin shim of plastic (nearly the height of both sandwiched elements)
around the circumference gap between the outer lenses sides and inner cell
wall to help with centering. Still allowing enough room for expansion and
contraction. Every little bit helps.
Well, I know this is a lot of information to digest, but I just wanted to be
as clear as possible. I am sure most are quite aware of the delicateness of
optics, so I hope I did not overstate in any manner that would cause anyone
to think otherwise. Should you need any additional information or support, I
would be more than happy to provide; as long as this old brain can be of
help.
Here�s wishing everyone much success.
PS
- There are quite a few lenses of different sizes and manufacturers that
come with these o-rings. It may be worthwhile to try this air space
modification on them. I can not guarantee or claim any performance
improvement, but I think it is worth it to try if your objective is not
performing to your expectations. I plan to try this method with other
scopes in my arsenal. Please feel free to contact me at the email address
below if have any questions or comments.
VSC-ASTRONOMERS@
VEGA-SKY-CENTER.COM
Written by Mel Dawson
December 31, 2009
VSC/ SAO Branch of the Vega Sky Center
Mel |
|
The VSC/ SAO 127mm f/9.4
"BGRP" Refractor

The VSC/ SAO 127mm f/9.4 Brigadier General Richard Pierce
Refractor with North Star II field tripod upon completing
its construction on December 14, 2009.
|
-
On December 14, 2009, I
finally completed the building of the VSC/ SAO 127mm f/9.4 BGRP
Refractor w/ North Star II Field Tripod!!! This is another
milestone for the VSC, as it was with the rise of the 10" f/5.6 "Gary
Barabino" Fork Mounted Newtonian Reflector. This refractor was
constructed without a budget, BUT with budget in mind. The primary
objective in constructing this instrument is much like that of the 10"
Newt. To build a low cost telescope and mount that performs like a
wellmade manufactured instrument costing far more. I believe I have
achieved that goal.
-
Also in building this
telescope, I wanted to dedicate it to a special friend who played a big
part in making this instrument possible, as well as paying tribute to
his support of this great nation of ours as a member of the armed
forces.
"Brigadier
General Richard "Dick" Pierce, Ret."
-
And... as most of you had
already surmised, I will be creating a section on our WebHub covering
the construction overview of this awesome instrument under the "Mel's
Gleaning Pages". The refractor build section will be
divided into two main parts; the OTA and Tripod. So, please visit often
for updates.
For
the latest on my refractor's construction process as posted on Cloudy Nights, please click
the link below. My entries are under the member name "dawsonian2000".
Surplus Shed 127mm Refractor Build
|
|
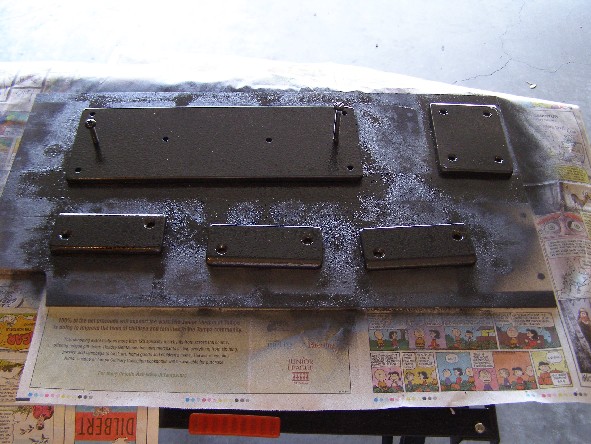
VSC/ SAO 127mm f/9.4 "BGRP" Refractor


-
November 20, 2009 - Over the past few months,
the construction of the VSC/ SAO 127mm f/9.4 BGRP refractor has been
going slowly. Nevertheless, when I look back at all I had to go through in the build process
of this scope, I can not complain. As the Thanksgiving holidays
approach, I am nearing the completion of the North Star II field tripod.
The photo on the top left shows one of the tripod's legs hanging with
the spar varnish curing. The top right photo shows the sanded unpainted
aluminum faceplates and dovetail plate. The lower left image reveals the
hammered finished paint job I sprayed on. It's a Rustoleum product. The lower right
picture is of the finished dovetail plate and accessory tray faceplates.
Now, I just need to finish the center legs and build the wooden
accessory tray. For an enlarged view of these pictures, please
click on the images above. For the latest updates
on my refractor's construction process on Cloudy Nights, please click
the link below. My entries are under the member name "dawsonian2000".
Surplus Shed 127mm Refractor Build
|
Gary Barabino's recent
assembly of his
127mm f/9 Refractor
-
On October 26, 2009, Gary
Barabino of the VSC/ VAO completed the assembly of his 127mm f/9 Yulin
refractor he put together from an objective he purchased from Mel Dawson
of the VSC/ SAO and the tube assemble from Sheldon Faworski. On November
13, 2009, I visited Gary at his Slidell, LA residence and was graced
with the pleasure of seeing his new scope acquisition first hand.
Despite the effects of upper level cirrostratus clouds, which hampered our
chances of looking at any faint DSO's, we had a ball using this fine
instrument. Despite the clouds, we were able to observe Jupiter and the
Orion Nebula. The views were quite good, but Gary is currently working
on centering the focuser, which is off axis by about 3/4". For an enlarged
view of Gary's Yulin refractor, please
click the image above. For a more detailed
overview of Gary's refractor work on Cloudy Nights, please click
the link below. His entries are under the member name "BarabinoSr".
Surplus Shed 127mm Refractor Build
|
|
VSC/ SAO 127mm f/9.4 "BGRP" Refractor

-
On August 16, 2009, which is
also the 39th Anniversary of the Vega Sky Center, I decided to spend the
time working on the legs for the North Star II field tripod in an effort
to complete the 127mm f/9.4 BGRP refractor. My next move will be in the
fabrication of the aluminum faceplates that will be installed on the
outside and inside surfaces of each of the three legs. The is definitely
going to be a challenge. For an enlarged view, please
click the image above. For a more detailed
overview of my refractors construction process on Cloudy Nights, please click
the link below. My entries are under the member name "dawsonian2000".
Surplus Shed 127mm Refractor Build
|
The Vega
Sky Center's is now
!!!

-
It was a partially lunar
eclipse on August 16, 1970 that inspired two young lads living in the
Desire Housing Projects in New Orleans to embark on a
whole new world within their lives to form what is now know as the Vega
Sky Center. It is hard to believe how long ago that was and how
much different things are today,. but we thank God for our strong friendship
and willingness to share our endeavors with others within the astronomical community
in hopes of perpetuating this greatest of pastimes. We hope you join us
in wishing the VSC a Happy 39th Birthday. We look forward to continuing to
improve our WebHub to satisfy as many amateurs as possible. Thanks to
all of our visitors and friends for their support. Please feel free to
email us with your suggestions and comments at:
"vsc-astronomers@vega-sky-center.com"
Mel
Dawson & Gary Barabino
|
|
VSC/ SAO 127mm f/9.4 "BGRP" Refractor
-
After
anxiously awaiting painted components to outgas, I finally completed the
assembly of the VSC/ SAO 127mm f/9.4 BGRP Refractor on May 30, 2009.
Overall outside of clear
coat issues I encountered, the end result turned out utterly fantastic! I will be
creating new pages showing the overall fabrication of
the OTA under the SAO Gleanings page in due time. The next step in the
process will be the construction of the North Star II Field Tripod,
which will support a CG-5 equatorial head given to me by Gary Barabino.
As for First Light and star tests, dates have not been decided. more
details to follow...
Click on the links below to
see an enlarge view of various poses.
|
The VSC
Showcase Section
has
moved to its own page !!!

-
In our efforts to aid in
organizing and navigation of the homepage of the Vega Sky Center's
WebHub, we decided to move the "VSC Amateur Showcase" section to its own separate
page. To get to the page, just click on the "VSC Amateur Showcase"
button at the top of the homepage. You can always go back to the
homepage just by clicking the "Home of the VSC" button on this
new page. To go to this page from here, just
click on Curt Walker's image of M51 above. Page was moved on 06/06/2009.
|
|
VSC/ SAO 127mm f/9.4 Refractor
to be
Dedicated to
"Brigadier General Richard Pierce (Ret.)"
-
In early January, 2009, I
had the privilege of meeting a gentleman by the name of Richard Pierce
via the sales of my Astro-Tech AT80 80mm f/6 refractor. I later
discovered that Dick served in our armed forces attaining the rank of
Brigadier General. He is now retired, and enjoys amateur astronomy as
one of his passions. Dick has quite an extensive collection of
astronomical equipment. When I mentioned to him that I was going to be
constructing a 127mm f/9.4 refractor, he was very generous in donating
some fine components to the project. It was hard to accept these items
from Dick. It should have been the other way around in my book.
Therefore, I commemorate this refractor to him, who served this country
so well. Currently, the OTA is in its final stages of construction. Construction
overview pages for the SAO 127mm f/9.4 'BGRP' refractor are now
complete. Please stay tuned. There's more to come!
Click on the refractor thumbnail image above to
go to the OTA components overview!
|
D ennis
Farr of the "FarrOut Observatory"
with David Levy

-
On the evening of April 4th,
2009, Dennis Farr (right side) of the FarrOut Observatory had the
privilege to spend some time with David Levy during an appearance he
made in Sarasota, FL as part of the 100 Hours of Astronomy. The young
lady to the left of the photo is Tanja Diederich, who once worked at the
Museum of Science and Industry (MOSI) in Tampa, FL. Click the image
above for an enlarged view.
|
|
The VSC/ VAO SuperCrew
Array is Coming!
-
Gary Barabino of the VAO
branch of the Vega Sky Center is currently working on a new telescope
project! He calls it the VSC/ VAO SuperCrew. The array riding atop a
massive Starliner equatorial mount designed to carry a 14" to
16" Newtonian will consist of a 12" f/5 Antares Newtonian with
optics upgraded by Optic Wave Laboratories, a 4.25" f/10.5 Edmiund Newtonian,
Casta 70mm f/10 Refractor, 60mm f/12 Atco Refractor, and 50mm f/12 Tasco 6te Refractor.
With all tubes stripped of their old paint jobs (except the Casta 70mm -
unseen), as of April 25, 2009, Gary has flocked them
with Protostar flocking material and will be painting soon. The primary
will be shipped out shortly for stripping, refiguring to 1/10+ wave by OWL.
More updates and a construction overview of this project will follow. Click the image
above for an enlarged view.
|
The VSC
"North Star"
Field Tripod
to be featured in theMarch /
April 2009 issue of
Astronomy Technology Today

-
The construction overview of
the VSC "North Star" Field Tripod to be
featured in the March/ April 2009 is of Astronomy
Technology Today. This article was written by
Mel Dawson to help amateur astronomers
on a limited budget to build a sturdy support unit to hold their scope
without breaking the bank. As you know, high-end tripods can cost a fortune.
But, with the North Star, or ideas from it, many amateurs could benefit from
the same stability factors as those high-end models. I hope the article will
inspired many. So get your copy once it hits your stands.
vsc-astronomers@vega-sky-center.com.
|
|
Official Dedication of the
SAO 10" f/5.6 Fork Mounted Newtonian
-
January 20, 2009 marked the
2nd Anniversary of the completion of Mel Dawson's SAO 10" f/5.6 Fork
Mounted Newtonian Reflector. In commemoration of this milestone, the
telescope was dedication to my great friend and childhood mentor
Gary Barabino. Gary was a strong
influence in my life during the early years, and continues to do so. He
introduced me to astronomy when I was 12 years old, and it was one of
the things that kept me on track throughout my life. With great
appreciation it gives me pleasure to dedicate my telescope to Gary,
whereby it will be now known as the:
"SAO 10"
f/5.6 'Gary Barabino'
Fork Mounted
Newtonian Reflector"
|
My Third Observing Session at the
FarrOut Observatory in Dade City, FL
-
On January 24, 2009, another
observing session was enjoyed by a small group out at Dennis Farr's
FarrOut Observatory in Dade City, FL. Though weather conditions were
unfavorable, the observing session still had some high points. Please
click on the image of Dennis Farr
above to go to the observing notes page as reported by Mel Dawson.
|
|
Recently
discovered
Comet
Lulin Making an Appearance
A
Special Report by Gary Barabino
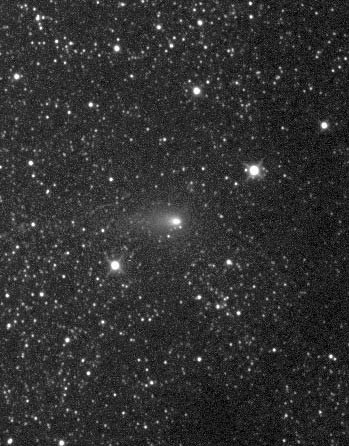
-
Comet Lulin was still
only about 11th or 12th magnitude when Michael Jaeger took this image on
Sept. 2, 2008. He used an 8-inch f/2.8 ASA Astrograph with a SXV H9 CCD
camera for this stacked pair of 4-minute exposures. Click image for wider
view. Image by Michael Jaeger,
Courtesy Sky and Telescope.
|

-
Upon
doing a review of some of the sections of the VSC WebHub, we discovered a
myriad of errors which required correcting. In the future I would hope that
visitors will email the VSC with any issues they run across on the WebHub that
warrants fixing. Remember...
This is your WebHub
as well as ours.
This will help to foster a more concise resource of information for all
amateur astronomers to enjoy. We appreciate your feedback and look forward
to your suggestions, links, etc. to make the Vega Sky Center Astronomical
WebHub the best it can be. So, show your support and email us at the address
below:
vsc-astronomers@vega-sky-center.com
|
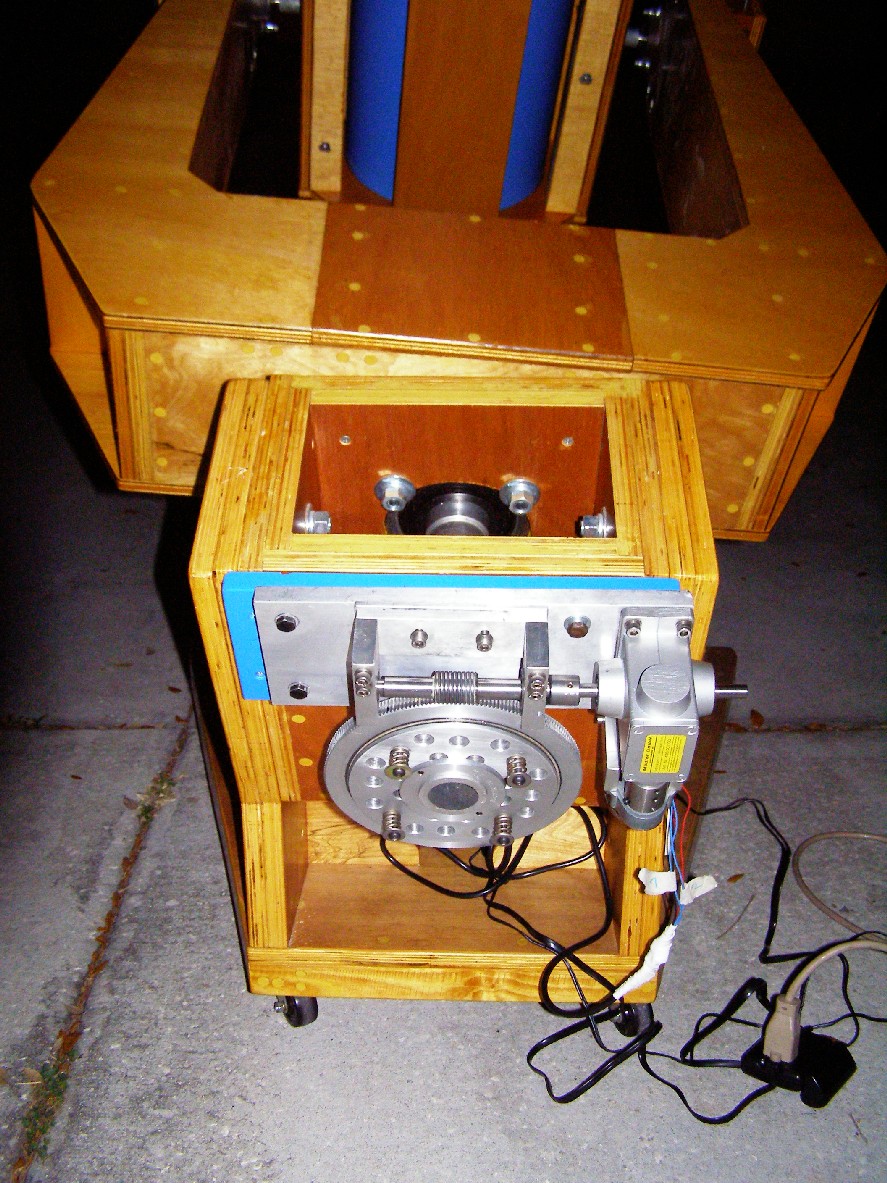
The
custom made RA axis clock drive for Mel Dawson's 10" f/5.6 Fork Mount
Newtonian has been installed and is working splendidly. Built by Eric
Moerman of Belgium, it
was designed specifically for this telescope from a declination drive Eric
used on his 12.5" Newtonian. The main gear is 8" in diameter and
the motor is a Hurst 1 rpm of synchronous design. A special gear box
device incorporated into the drive system aids in precision tracking. The
drive corrector used with this drive is a JMI MotoTrak III with hand
paddle capable of use with additional devices, such as a declination drive
and Motofocus focuser drive. The Moerman
Clock Drive is a work
of art indeed. When the
clock drive is engaged it starts tracking immediately! There is absolutely
no slop!!!

|
-
Using
his TeleVue NP127 127mm f/5.2 Apochromatic Refractor in
conjunction with a QHY8 CCD camera, good friend and fellow
astrophotographer Kevin
Reese took this
outstanding image of M31 (NGC 224) the Andromeda Galaxy with its
companions M32 (NGC 221), and M110 (NGC 205), while on a trip to
the Chiefland
Astronomical Village (CAV) in Florida. Being a knowledgeable and accomplished imager, a
section will be added to the Honorary
VSC Members
section in the future.

|
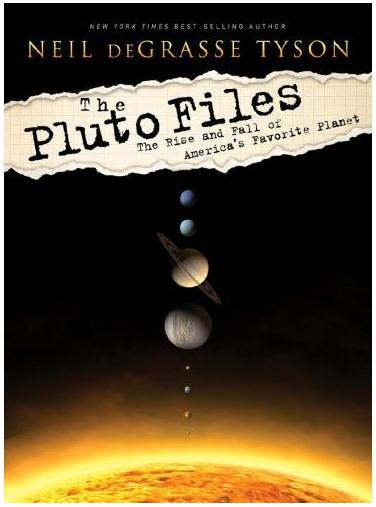
-
As we all know, Pluto
has been declassified as a planet in our Solar System and is now
designated as a Kuiper Belt Object by the International
Astronomical Union. A long time proponent of this ideology is Neil
deGrasse Tyson,
Director of the Hayden Planetarium at the American Museum of
Natural History in New York, NY. Recently, I was in touch with Dr.
Tyson and discovered that he has written a new book called
"The Pluto Files: The Rise and Fall of America's Favorite
Planet". It is slated for release in
January of 2009.
|
vsc-astronomers@vega-sky-center.com.
|