SAO JAEGERS 6 INCH F/10 "GELINDA J. DAWSON" REFRACTOR OTA BUILD OVERVIEW

Page 6 of 10


All four baffles cut out using the laminate trimmer/ Jasper circle cutting guide combination - ready for knife-edge - 11 (Click to go to page) One of the baffles reloaded onto the plywood substrate in preparation to receive the knife-edge - 12 (Click to go to page) Laminate trimmer with a v-groove bit installed to make the knife-edge in each baffle - 13 (Click to go to page) After adding a small Jasper circle cutting jig, the knife-edge was cut - 14 (Click to go to page) The aluminum ring helped prevent the polycarbonate shrapnel/ debris from flying all over the place. Knife-edge done - 15 (Click to go to page)
Knife-edge for the first  baffle cut free - back facing side - 16 (Click to go to page) Knife-edge for the first  baffle cut free and ready for finishing before protective film is removed - front facing side - 17 (Click to go to page) Checking and verifying knife-edge opening in first baffle - 18 (Click to go to page) Knife-edge for the second baffle cut free - 19 (Click to go to page) Checking and verifying knife-edge opening in second baffle - 20 (Click to go to page)
Knife-edge for the third  baffle cut free - 21 (Click to go to page) Checking and verifying knife-edge opening in third baffle - 22 (Click to go to page) The fourth and final battle nearly cut free - 23 (Click to go to page) Knife-edge for the fourth baffle cut free - 24 (Click to go to page) Checking and verifying knife-edge opening in fourth baffle - 25 (Click to go to page)
A look at the build-up of polycarbonate debris buildup around the v-groove router bit - 26 (Click to go to page) All four baffles cut out and ready for finishing - 27 (Click to go to page) All four baffles cut out and ready for finishing with film removed - 28 (Click to go to page) Set of small files to be used in finishing the baffles - 29 (Click to go to page) Small file being used to remove the burrs from the baffle's knife edge - 30 (Click to go to page)
Using a box cutter to trim off stubborn burrs after filing of baffle's knife edge - 31 (Click to go to page) Sanding the baffles to created a matte finish before priming and painting - 32 (Click to go to page) Sanding completed for the baffles (front) - 33 (Click to go to page) Sanding completed for the baffles (back) - 34 (Click to go to page) Drilling three evenly spaced holes in first baffle - 35 (Click to go to page)
Holes in first baffle will be used as a template for the others - 36 (Click to go to page) Tracing holes using onto other baffles using the first as a template - 37 (Click to go to page) Close-up of hole in first baffle showing marking onto the next - 38 (Click to go to page) Getting ready to drill holes in the remaining baffles - 39 (Click to go to page) Close-up showing laser centered onto mark on baffle before drilling - 40 (Click to go to page)
                                                       

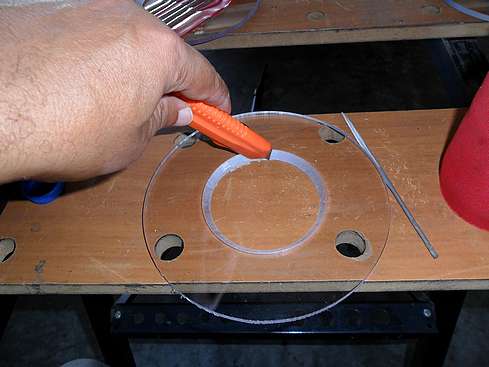
Fabrication of the knife-edge baffles moves on in section 6 of 10 using light weight, strong polycarbonate sheet (Lexan). I provided a lot of detail regarding their construction. Actually they were a snap to make. They turned out beautifully. Contact us at the email address below if you have any questions or comments: 

vsc-astronomers@vega-sky-center.com
 

Back to Page 5 of 10 Page 6 of 10 Go to Page 7 of 10